Haven’t worked on the puppet today.
I can’t find the videos for the character animator
Been trying to work on Lesson 10 for the 3rd time. Some files weren’t available so I had to restart and download them all.
Haven’t worked on the puppet today.
I can’t find the videos for the character animator
Been trying to work on Lesson 10 for the 3rd time. Some files weren’t available so I had to restart and download them all.


I have no clue why the fly doesn’t move on here. It only moves whenever I do control->Test on Animation so I think I did it right.

Introducing after effects:After effects are industry standard visually animation software.You use after effects to create motion graphs, visual effects, and 3D animations. You can Composite(Combine) layer, animate layer properties, create transparency apply and animate effects, create and animate text and shapes.
Step By step
Open after effects
-Start a new project and save it
Import and organize assets(footage)
Create one or more compositions
Add assets and layer to comp
-Assets:Videos, images, graphics, audio
-Layers: text, shapes, solids
Composite(Combine) layers in a comp
-Using existing transparency
Adjust and animate layer properties
-scale, position, rotation, opacity
Add effects and adjust/animate effect properties
Edit-Preference-General-Uncheck at start-up show home
Keyframes mark the beginning and the end of some kind of animation.(Beginning and end of focus distance, position, and etc)
——————————————————————————————————————————-
Control-I to import files or click the empty spot on the middle left of the screen and that will open the import dialog box where you can access your files
When importing a file you make sure photoshop sequence is off(Which it normally is)
When importing the file you would want to bring it in as composition retain layer sizes
Make sure to organize your files by putting them in folders
Setting up New comps-
Go to composition at the top left or do control-N. You can also open the composition menu by the mid left in the box with little shapes in it. That’ll open up the composition settings
When you’re making a composition, scaling and transforming the composition you open up a disclosure triangle which is the greyed out Square and then transform. When you open it up the scrubby will appear when you hover over a value. When clicking then dragging left or right you can change the values of the composition.
——————————————————————————————————————————-
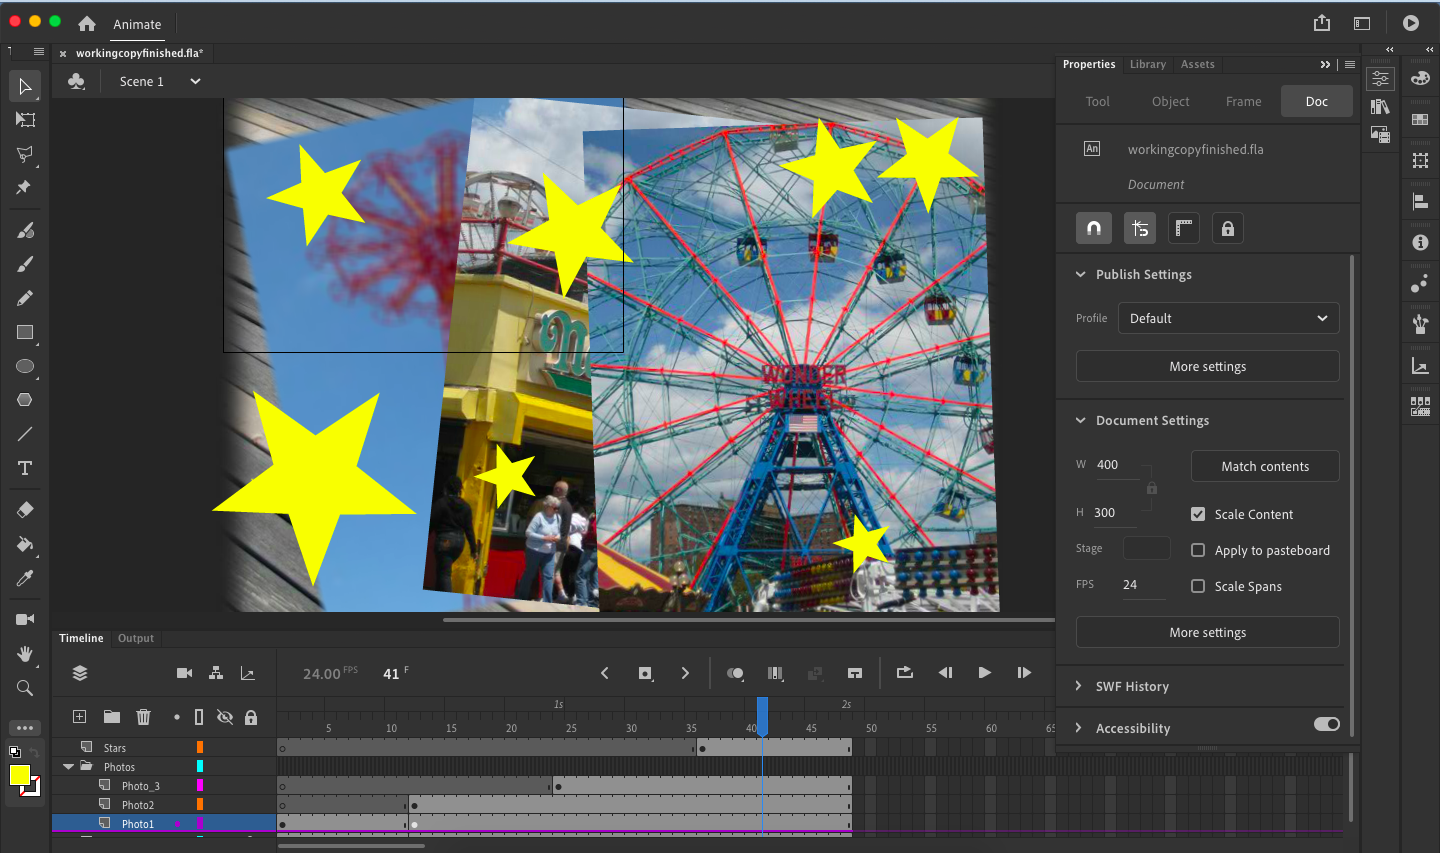
You can right click assets(Coastline) and open New comp from selection and it opens the file from that menu onto the space to the right
Dragging an asset(Woman 2) into the box where comps are expanded you can drag the file into the comp panel and they will appear in the panel. You can adjust their size if its too big with the scrubby menu below it.
Order counts on which assets are whereas the assets on the top will be overlapping everything under it. Make sure backgrounds are to the back so it won’t overlap any of your people.
Drag assets to show up at a certain time buy bringing it to the bottom and right to the timeline and drag it to where you want it to show up.
New Comp Icon(Mid-Bottom left)=Use any preset(He used HDTV)=Make however many seconds you want(He made 10)
Top Icon where it shows the layer on there you go to new and you can customize how you want it to look with text, solid, shape layer, and Adjustment layer.
Null Object allows you to control more than one layer
A solid layer is a rectangle in a certain color(Going up to layer and solid settings you can change your already selected color of the rectangle)
The text Layer just adds a text box(You move text with the selection tool)
For adding shapes use to shape button at the top(It looks like a square) and is called the rectangle tool.It open up 5 different menus for 5 different base shape types(He clicked Star)
Once you’ve figured out what shape your going to use you go on the canvas where your assets are then you left click and drag out to expand the shape.
——————————————————————————————————————————-
There are 5 transform properties
Position-Position of the anchor point within the frame
Scale-Changing the width or height of the asset
Rotation-Rotating the asset in degrees
Opacity-How visible the asset it(Opaque means it most visible and transparent is less visible(See through))
Anchor point-Value is its location in or outside the layer(You can reset it by right clicking then choosing reset.)
Skew-Stretching the object horizontally
(For transform properties he wants you to add a resolution of 1080p 29.97 HDTV)
(Then he wants you to add a solid layer comp)
(After he wants you to open the Disclosure triangle for the layer then open the transform menu)
The tool to remove anchor points is called the Pan behind tool which you can click Y to use.
Marquee select is selecting multiple assets. You do that by clicking and dragging your mouse in the asset box, and it’ll make a square from your start to finish and highlight the assets. Once highlighted they will all be selected and once you do something with one of them the effect will be to all.
You can solo select a layer by clicking on the box by the eye in the assets layer. It’ll only make the layer you solo’d appear in the visible box of your assets.
Text layers have a text disclosure box and transform disclosure box(The text disclosure box you can change how your text is formatted)
Shape layers has a transform property box and a content property box
The diamond at the bottom left adds a keyframe equal to your current value.
Bezier curves-The flow of which an object will move in an animation
Easy Ease- Makes your animation look more realistic
Easy Ease in-Starts slowly then speeds up
Easy Ease out-Starts quickly then slows down
You can zoom in and out of the screen size by clicking the disclosure button next to the percentage on your animated screen which allows you to zoom in and out of the animation
——————————————————————————————————————————-
You can add text by right clicking in the timeline on the bottom left, Clicking new then text.
Once you open up a text a character panel, a paragraph panel, and something in the middle top will appear.
You can also control T or clicking the type tool at the top to make a text.
Leading controls the spacing between lines
——————————————————————————————————————————-
To use the pen tool click the pen in the top menu or you can click g
Pen tool allows you to draw a shape
When opening up the pen tool there are menus at the top that show fill and stroke and have a box next to it with a color.
When drawing with the pen tool on an existing layer you won’t draw out a shape and the boxes at the top will disappear.
Drawing on a layer creates a mask
When the circle appears under the peen where your cursor is, that means your
Going to close off the max which crops that piece out of the layer. Everything outside of the lines you created will be blacked out.
When creating the mask it will add a mask layer to the bottom left box.
You can change the shape after making it by opening up the shape then path from the disclosure triangle.Then you turn on the stop watch which will add a keyframe in the timeline. Squares will appear on the edges of the shape you made. If you move them around then they’ll change how the shape is.
You can also just use the pen tool to do that
Roto bezier creates curves automatically. You find that at the top of the screen when having the pen tool active
Using the Pen tool you can click and drag which creates bezier handles. Which you can click and drag to more curves on the shapes, you create your shape and when you’re done you go to the beginning to connect and close it off.
Adding effects to layers create a solid layer(He does that), then go to effects & Presets type in grid.Under generate do that grid. You can drag it to a comp layer or down to the layer.
Polygon tool can be accessed by clicking on the Polygon or Q
The fill menu tell you the color you will be using for the shapes that will fill the inside.
In the layers menu going to contents and clicking on a shape(He did rectangle 1) you can open the rectangle path and change how the rectangle is shaped or positioned.You can make it round, bigger, or where it is.
The shift key when expanding or shrinking an object constraints it which makes shrinking and expanding proportional
Holding the space bar allows you to freely move the object
The star in the layer box that says ‘For comp layer:Collapse Transformations,For vector layers:Continuously rasterize’
For vectors a pixelated image that is resized will become a clear image.
It makes it a pixel based layer but he wants to change it to a shape.
To do that right-click the layer and go to create, you want to create shapes from vector layers
Shape Concepts
Two shape types:
-Parametric(Shape tools)
-Bezier(Pen tool, text, or pasted path)
Shapes consist of:
-path
-Stroke(Optional)
-Fill(Optional)
Shape path operations:
-eg. , Repeater, twist, pucker, and bloat
Shape groups=merging paths
The path operations allowed A circle to become an oval, A square have round edges, Give a polygon less sides or more, make a star have less points or changing its characteristics to become kind of inverted,make a hand made shapeshift into a duck, mess with letters to twist them and using plucker and bloat to morph its shape and texture, last animating a bird to make it appear to be flying in place. Create replication through the animation by pressing the spacebar and guiding it
Pressing the U key shows the keyframes showing adjustments and changes and allowing you to do so.
Changing colors of an object/Gradient(learned from photoshop) the fill buttom at the top after creating a shape or layer.
Polystars >type
Points-how many point/edges the shape would have
Position-Where it is in the animation
Rotation-Changing the degree
Outer radius-Making the shape bigger or smaller
Outer roundness-Smoothing out the outside(Can invert the edges if raised high)
Stroke is the outline of a shape and can be changed(Color wise)
Pucker and bloat- Default=10 A positive number add bloat which makes it appear bloated
And a negative number add pucker which gives hit more of a pointed appearance
You can turn off the display of the path by clicking the square that has the upper left edge cut off
Trim paths:
Start-use to animate the path on
End-use to animate the path off
offset-To angle the offset in the shape to where that point will not appear
Twist:
Twist-Makes the object more twisted left or right
Center-Twist off the center
Wiggle paths:
Size-Changes the size of the wiggles on the shape
Detail-Makes the wiggles more ragged
Points-Make sharp or smooth corners
Wiggles/Seconds-
Correlation-
Temporal Phase-
Spatial Phase-
Wiggle Transform is transforming the wiggle same as you do with shapes
Zig Zag:
Size-Make the wiggles bigger
Ridges per segment-How many ridges per segment/ per line
Points-Making the corners rounded or sharp
Repeater:
Copies-Increase the number of copies
offset- Allows you to decide where you start or end with the shapes
Repeater transform you can change where is what happen to the other copies.
Introducing after effects:After effects are industry standard visually animation software.You use after effects to create motion graphs, visual effects, and 3D animations. You can Composite(Combine) layer, animate layer properties, create transparency apply and animate effects, create and animate text and shapes.
Step By step
Open after effects
-Start a new project and save it
Import and organize assets(footage)
Create one or more compositions
Add assets and layer to comp
-Assets:Videos, images, graphics, audio
-Layers: text, shapes, solids
Composite(Combine) layers in a comp
-Using existing transparency
Adjust and animate layer properties
-scale, position, rotation, opacity
Add effects and adjust/animate effect properties
Edit-Preference-General-Uncheck at start-up show home
Keyframes mark the beginning and the end of some kind of animation.(Beginning and end of focus distance, position, and etc)
——————————————————————————————————————————-
Control-I to import files or click the empty spot on the middle left of the screen and that will open the import dialog box where you can access your files
When importing a file you make sure photoshop sequence is off(Which it normally is)
When importing the file you would want to bring it in as composition retain layer sizes
Make sure to organize your files by putting them in folders
Setting up New comps-
Go to composition at the top left or do control-N. You can also open the composition menu by the mid left in the box with little shapes in it. That’ll open up the composition settings
When you’re making a composition, scaling and transforming the composition you open up a disclosure triangle which is the greyed out Square and then transform. When you open it up the scrubby will appear when you hover over a value. When clicking then dragging left or right you can change the values of the composition.
——————————————————————————————————————————-
You can right click assets(Coastline) and open New comp from selection and it opens the file from that menu onto the space to the right
Dragging an asset(Woman 2) into the box where comps are expanded you can drag the file into the comp panel and they will appear in the panel. You can adjust their size if its too big with the scrubby menu below it.
Order counts on which assets are whereas the assets on the top will be overlapping everything under it. Make sure backgrounds are to the back so it won’t overlap any of your people.
Drag assets to show up at a certain time buy bringing it to the bottom and right to the timeline and drag it to where you want it to show up.
New Comp Icon(Mid-Bottom left)=Use any preset(He used HDTV)=Make however many seconds you want(He made 10)
Top Icon where it shows the layer on there you go to new and you can customize how you want it to look with text, solid, shape layer, and Adjustment layer.
Null Object allows you to control more than one layer
A solid layer is a rectangle in a certain color(Going up to layer and solid settings you can change your already selected color of the rectangle)
The text Layer just adds a text box(You move text with the selection tool)
For adding shapes use to shape button at the top(It looks like a square) and is called the rectangle tool.It open up 5 different menus for 5 different base shape types(He clicked Star)
Once you’ve figured out what shape your going to use you go on the canvas where your assets are then you left click and drag out to expand the shape.
——————————————————————————————————————————-
There are 5 transform properties
Position-Position of the anchor point within the frame
Scale-Changing the width or height of the asset
Rotation-Rotating the asset in degrees
Opacity-How visible the asset it(Opaque means it most visible and transparent is less visible(See through))
Anchor point-Value is its location in or outside the layer(You can reset it by right clicking then choosing reset.)
Skew-Stretching the object horizontally
(For transform properties he wants you to add a resolution of 1080p 29.97 HDTV)
(Then he wants you to add a solid layer comp)
(After he wants you to open the Disclosure triangle for the layer then open the transform menu)
The tool to remove anchor points is called the Pan behind tool which you can click Y to use.
Marquee select is selecting multiple assets. You do that by clicking and dragging your mouse in the asset box, and it’ll make a square from your start to finish and highlight the assets. Once highlighted they will all be selected and once you do something with one of them the effect will be to all.
You can solo select a layer by clicking on the box by the eye in the assets layer. It’ll only make the layer you solo’d appear in the visible box of your assets.
Text layers have a text disclosure box and transform disclosure box(The text disclosure box you can change how your text is formatted)
Shape layers has a transform property box and a content property box
The diamond at the bottom left adds a keyframe equal to your current value.
Bezier curves-The flow of which an object will move in an animation
Easy Ease- Makes your animation look more realistic
Easy Ease in-Starts slowly then speeds up
Easy Ease out-Starts quickly then slows down
You can zoom in and out of the screen size by clicking the disclosure button next to the percentage on your animated screen which allows you to zoom in and out of the animation
Introducing after effects:After effects are industry standard visually animation software.You use after effects to create motion graphs, visual effects, and 3D animations. You can Composite(Combine) layer, animate layer properties, create transparency apply and animate effects, create and animate text and shapes.
Step By step
Open after effects
-Start a new project and save it
Import and organize assets(footage)
Create one or more compositions
Add assets and layer to comp
-Assets:Videos, images, graphics, audio
-Layers: text, shapes, solids
Composite(Combine) layers in a comp
-Using existing transparency
Adjust and animate layer properties
-scale, position, rotation, opacity
Add effects and adjust/animate effect properties
Edit-Preference-General-Uncheck at start-up show home
Keyframes mark the beginning and the end of some kind of animation.(Beginning and end of focus distance, position, and etc)
——————————————————————————————————————————-
Control-I to import files or click the empty spot on the middle left of the screen and that will open the import dialog box where you can access your files
When importing a file you make sure photoshop sequence is off(Which it normally is)
When importing the file you would want to bring it in as composition retain layer sizes
Make sure to organize your files by putting them in folders
Setting up New comps-
Go to composition at the top left or do control-N. You can also open the composition menu by the mid left in the box with little shapes in it. That’ll open up the composition settings
When you’re making a composition, scaling and transforming the composition you open up a disclosure triangle which is the greyed out Square and then transform. When you open it up the scrubby will appear when you hover over a value. When clicking then dragging left or right you can change the values of the composition.
——————————————————————————————————————————-
You can right click assets(Coastline) and open New comp from selection and it opens the file from that menu onto the space to the right
Dragging an asset(Woman 2) into the box where comps are expanded you can drag the file into the comp panel and they will appear in the panel. You can adjust their size if its too big with the scrubby menu below it.
Order counts on which assets are whereas the assets on the top will be overlapping everything under it. Make sure backgrounds are to the back so it won’t overlap any of your people.
Drag assets to show up at a certain time buy bringing it to the bottom and right to the timeline and drag it to where you want it to show up.
New Comp Icon(Mid-Bottom left)=Use any preset(He used HDTV)=Make however many seconds you want(He made 10)
Top Icon where it shows layer on there you go to new and you can customize how you want it to look with text, solid, shape layer, and Adjustment layer.
Null Object allows you to control more than one layer
A solid layer is a rectangle in a certain color(Going up to layer and solid settings you can change your already selected color of the rectangle)
The text Layer just adds a text box(You move text with the selection tool)
For adding shapes use to shape button at the top(It looks like a square) and is called the rectangle tool.It open up 5 different menus for 5 different base shape types(He clicked Star)
Once you’ve figured out what shape your going to use you go on the canvas where your assets are then you left click and drag out to expand the shape.

